(v0.1)
Table of Contents
- Introduction
- The Godot Graphics Pipeline
- Install the Godot Engine
- Design
- Create the Pong Project
- Viewport
- Text Label
- Frame Rate
- The Game Loop
- Handling Player Input
- Game Exit
- Information Hiding and Encapsulation
- Composition vs Inheritance
- Conclusion
- Advanced Concepts
- Versions
Introduction Link to heading
This is the first in a series of tutorials that will build up to a basic Pong clone implemented using the Godot engine. We will try to accomplish as much as we can in GDScript, which is the native scripting language of the engine, relying less on Godot’s SceneTree editor and Property Inspector. These tools, while incredibly useful, can make refactoring code, debugging, and writing unit tests more difficult; grepping over files in your project folder is much faster than having to inspect properties of the Nodes in the SceneTree, for example.
OOP (Object-Oriented Programming) is the driving paradigm in the design of GDScript and the Godot engine. You don’t need to become an expert in Object Orientated programming to use the Godot engine or GDScript, but you should take the time to become somewhat proficient. This tutorial introduces some principles of OOP but OOP isn’t covered in depth as this isn’t a general programming tutorial.
We start by implementing something seemingly straightforward, displaying the frame rate (fps – frames-per-second). Why start with the frame rate instead of jumping in and creating the Pong clone? See Software Development Estimation as to why.
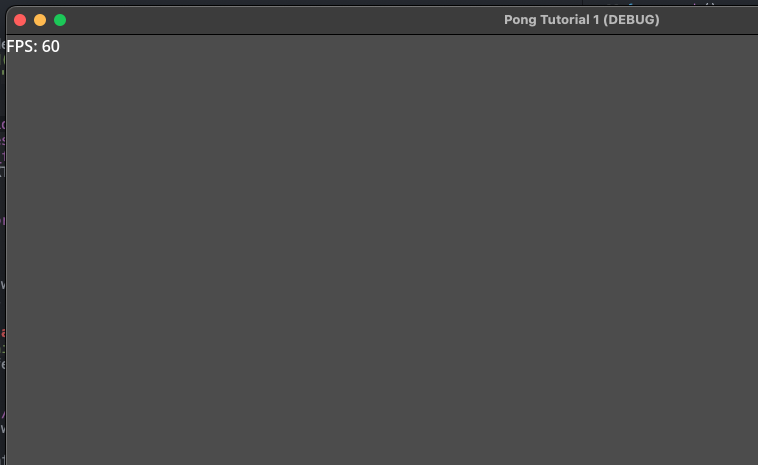
We begin with a high level description of how the Godot engine displays graphics to the screen.
The Godot Graphics Pipeline Link to heading
An object (Node) must be added to the Godot graphics pipeline to be rendered to the display. Nodes are visible in the Godot editor in the SceneTree hierarchy.
Pipeline components are described at a high level below;
The RenderingServer projects game objects (Nodes) onto a Viewport.
A Viewport owns the surface that the RenderingServer draws to. The Viewport is itself a Node in the SceneTree. The Viewport surface is what is displayed on your screen unless otherwise modified by a Camera Node in the SceneTree.
The SceneTree is a Scene Graph containing a hierarchy of Nodes, one of which is the Viewport. The SceneTree also manages the MainLoop (the game loop). As we will learn later, the MainLoop defines the virtual methods
_initialize(),_finalize(), and_process()that we override with our game logic.A Node is the basic building block of the Godot engine. Only nodes that are added to the SceneTree either in the Godot Editor or using the
"add_child"method can be displayed. A Node can have up to one parent Node and zero or more child Nodes. The Node at the head of the SceneTree is the “Root Node”. Note that “parent” and “child” here refer only to the Node hierarchy in the SceneGraph and not class inheritance.A Viewport is associated with a DisplayServer which is responsible for window management.
A Camera Node can be 2D or 3D and provides customization beyond what the Viewport provides. For example, a Camera3D Node is required to render a scene in 3D. A Camera also allows for only a subset of the Viewport to be rendered to the screen. Most Godot projects use a Camera Node. We do not as this tutorial does not require one.
Input and Engine are Singletons providing access to the underlying capabilities of the Godot engine. Input provides access to keyboard, mouse, and game pad events. The Engine provides access to engine internals such as version, the current frame count, the frame rate (that we need), etc.
The RenderingServer renders Nodes in the SceneTree that appear in the hierarchy below the Viewport Node to that Viewport surface using transform parameters in the Camera Node if one is present. A SceneTree may contain multiple Viewport Nodes but we will only make use of the default “Root Viewport” Node at the head of the SceneTree.
Install the Godot Engine Link to heading
the Godot engine if you have not already.
Design Link to heading
The tasks below outline the overall design. We go into detail in the following sections as to why.
Tasks
- Create the Project,
- Initialization:
- Create a Viewport,
- Add the Viewport to the SceneTree,
- Create a Text Label,
- Add the Label as a child Node of Viewport,
- Assign the Label a position in x/y coordinates,
- Process each frame;
- Retrieve the current frame rate,
- Print the frame rate to the Label Node.
- Process keyboard events,
- Exit when
Escis depressed.
- Game Exit
Create the Pong Project Link to heading
Create a default project with SceneTree, Root Node and the Viewport.
- Start Godot and create a project named “Pong” in a new folder,

Note: The “new Folder” icon is all the way to the right.

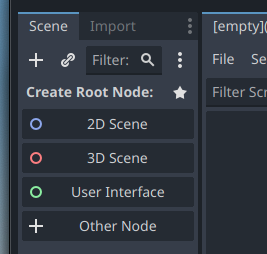
- Then choose “Other Node”,
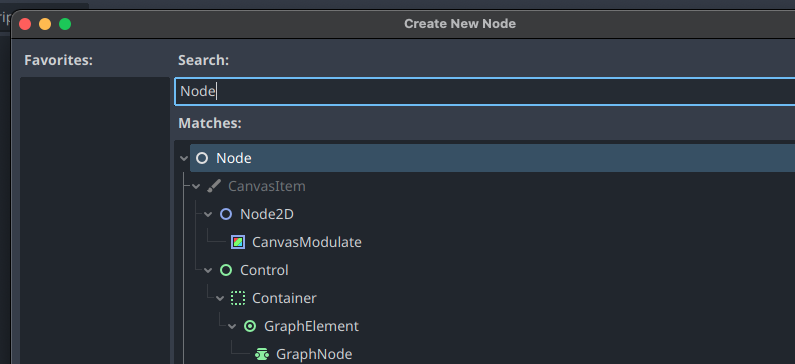
- And create the base “Node” (Class “Node”, Base class for all scene objects).
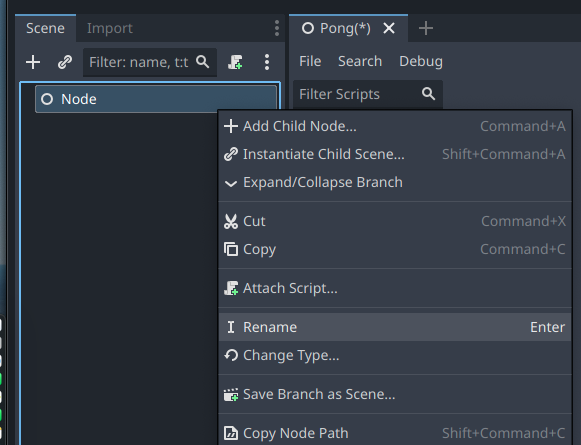
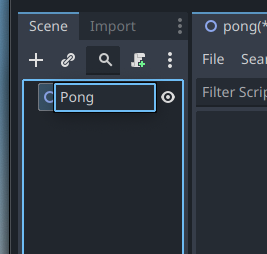
- Rename the root Node to “Pong”,
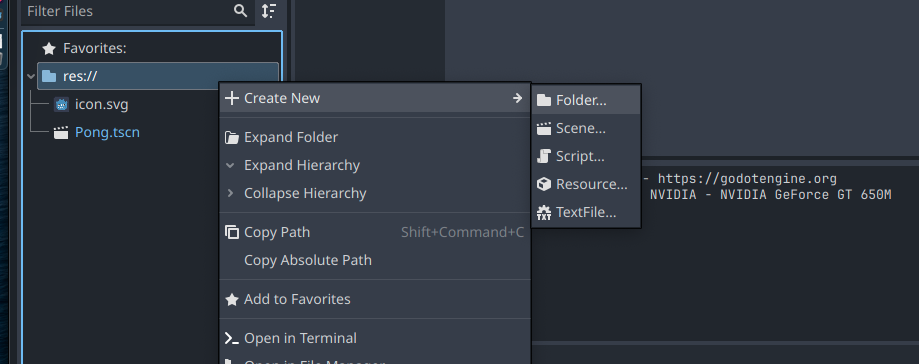
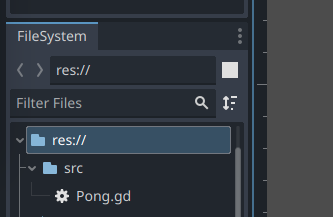
- Create a folder
res://srcwhere we will place our project source files so as to declutter the project root directory.
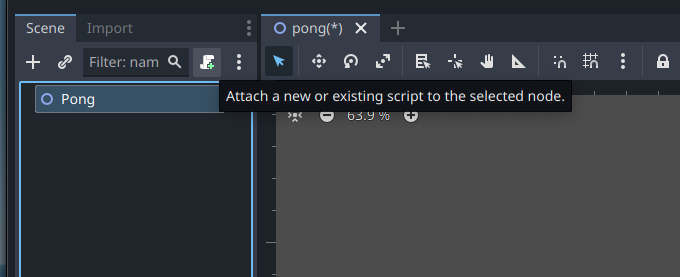
- Attach a new script to the filename root “Pong” node.
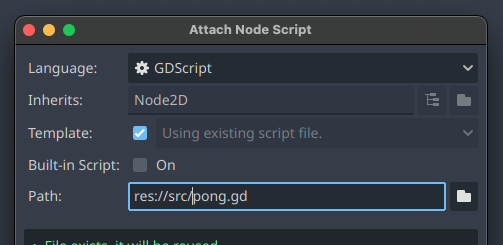
- And rename to
res://src/Pong.gd
- Open the
Pong.gdfile. Godot should have generated the following boilerplate code.
extends Node


# Called when the node enters the scene tree for the first time.
func _ready() -> void:
	pass # Replace with function body.


# Called every frame. 'delta' is the elapsed time since the previous frame.
func _process(delta: float) -> void:
	pass
OK, that’s about all the work we need to do in the Scene editor in this tutorial.
Viewport Link to heading
The RenderingServer renders the child Nodes of the Viewport to the Viewport surface. The Viewport surface is displayed to the screen.
We don’t need to create a RenderingServer or DisplayServer as these are managed by the Godot Engine. We also don’t need to create a Viewport as the “Root Node” by default is also the “Root Viewport”. We can also do without creating a Camera Node as we will be rendering the entire Viewport surface to our display without any customization.
See Classes and Class Inheritance for the implementation.
Classes and Class Inheritance Link to heading
Think of a class as the blueprints for a house and an object as the house once created (instantiated).
Open the script file Pong.gd. This file defines the Pong class and will contain the game logic we defined in the Design section. Change the first line as follows;
class_name Pong extends Node
The extends keyword means we are extending Node with a class Pong. Pong will subclass and inherit the methods and attributes from Node (inheritance being one of the principles of OOP). Almost all Godot components inherit directly or indirectly from Node. As we need to hook into the SceneTree, Pong must inherit from Node as well. Pong.gd will also contain the code we write in this tutorial.
We don’t explicitly create an instance of Pong using new() because we added it as a Node to the SceneTree. The SceneTree handles the creation and deletion of Nodes in its hierarchy. See the following section Object Instantiation and Variables.
Text Label Link to heading
We cannot render text directly to a Viewport surface as it does not support this capability, so we cannot print “Hello World” as we would to a terminal. Instead we need to add a Label Node to the SceneTree and write the current frame rate to this control using its set_text() method.
See the following sections Object Instantiation and Variables, and Dynamic vs Static Typing for the implementation.
Object Instantiation and Variables Link to heading
We need to create an instance of Label to display the frame rate – in effect we are instantiating a new Label object. We do this by calling the constructor method
new() on the Label class which returns a new object of type Label.
var fps: Label = Label.new() # Create a new Label object
The = assigns the object returned by Label.new() to a new
variable created by var having the namefps and type Label.
We are now able to call the set_text() method on the instance of Label stored in fps, passing in the current frames per second as a String argument.
var fps: Label = Label.new() # Create a new Label object
fps.set_text("frames per second")
Dynamic vs Static Typing Link to heading
GDScript is a dynamically typed language that supports explicit type definitions.
In the example below, we assign a Label object to the untyped variable fps_untyped and a Label object to the typed variable fps_typed. The typed variable fps_typed can only hold objects of type Label or objects of classes that inherit from Label. An attempt to assign any other type will cause a compile time error. The untyped variable fps_untyped can hold objects of any type.
var fps_untyped = Label.new() # Untyped

var fps_typed: Label = Label.new() # Typed
It is good practice to specify types as much as possible, even though doing so makes code more verbose, as this eliminates an entire class of errors that can be caught by a developer at compile time versus having players experience these bugs at runtime. Languages like Python are dynamically typed while a language like Go is statically typed.
Frame Rate Link to heading
Now we need to calculate or retrieve the current frame rate. Handily, Godot provides the get_frame_per_second() method for this purpose.
See Singletons for the implementation.
Singletons Link to heading
Godot provides the Singleton object Engine that implements the method get_frames_per_second() that returns the current frames-per-second. A Singleton is a design pattern used to ensure that there will only ever be one instance of a class, as an alternative to assigning an object to a global variable. We don’t need to create an instance of Engine using new() as the Engine is managed by Godot.
var fps: Label = Label.new() # Create a new Label object
fps.set_text(str(Engine.get_frames_per_second())) # Set fps.text to the current fps
The str() function converts the float returned by Engine.get_frames_per_second() to a String value required by set_text. Not performing this conversion will result in a runtime error.
The Game Loop Link to heading
The game loop drives the game. Everything that happens in the game, physics, AI, sound, handling input, rendering graphics, networking, game mechanics, happens in the game loop. A game loop will typically execute between 30 and 60 times each second.
- Create the Project,
- Initialization:
- Create a Viewport,
- Add the Viewport to the SceneTree,
- Create a Text Label,
- Add the Label as a child Node of Viewport,
- Assign the Label a position in x/y coordinates,
- Process each frame;
- Retrieve the current frame rate,
- Print the frame rate to the Label Node.
- Process keyboard events,
- Exit when
Escis depressed.
- Game Exit
Steps (1.1) - (1.5) should be performed once, while steps (2.1) - (2.4) are performed each frame. We can accomplish this by overriding the _initialize() and _process() methods defined in the MainLoop.
See The SceneTree, Variable Scope, Static and Instance Methods, Conditionals, and Constants for the implementation.
The SceneTree Link to heading
The SceneTree is what is called a scene graph, a hierarchy of Nodes in an inverted tree structure.
The Label must be added to a Node in the SceneTree before the frame rate can be displayed. One of our first steps was to add our Pong Node to the SceneTree by subclassing the Root Node. We are now able to add Label as a child Node to the Pong Node using the add_child method. Note that Label is also a subclass of Node and therefore inherits all of Node’s attributes and methods.
var fps: Label = Label.new() # Create a new Label object
self.call_deferred("add_child", fps) # Explicitly add the label to the scene
fps.set_position(Vector2(0,0)) # Set position
fps.set_text(str(Engine.get_frames_per_second())) # Set fps.text to the current fps
Calls to add_child() (and free()) are generally passed into a call_deferred() method that postpones execution of "add_child" until idle time.
In the code, we call self.call_deferred, where self refers to “the current Node”, in this case the Pong Node. GDScript does allow self to be omitted but I prefer to use self as it makes explicit that a method is being invoked on the current Node.
The SceneTree manages the MainLoop which calls the virtual methods _initialize(), _finalize(), and _process() on each Node object in the SceneTree.
To recap;
- Initialization:
0. Create the project,
- Create a Viewport,
- Add the Viewport to the SceneTree,
- Create a Label Node,
- Add the Label as a child Node of Viewport,
- Assign the Label a position in x/y coordinates,
- Process each frame;
- Retrieve the current frame rate,
- Print the frame rate to the Label Node.
- Process keyboard events,
- Exit when
Escis depressed.
To implement “Initialization” and “Process each frame”, we override the virtual methods, _ready() and _process(). Unlike Instance methods, Virtual methods must be implemented by the subclass.
_ready()is called after a node is added to the scene graph and is ready for use, and_process()is called each frame.
func _ready():
    var fps: Label = Label.new() # Create a new Label object
    self.call_deferred("add_child", fps) # Explicitly add the label to the scene
    fps.set_position(Vector2(0,0)) # Set position

func _process(_delta: float):
    fps.set_text(str(Engine.get_frames_per_second())) # Set fps.text to the current fps
But how does Godot know to call our methods? When the game starts, Godot will instantiate the root node (Pong). Pong instantiates the Label Node and adds this as a child node to itself (using "add_child"). The SceneTree calls _ready() after Pong the Pong Node is added to the SceneTree, and calls _process() once per frame. The SceneTree will call _ready() and _process() on the Label object if we had overridden those methods, which we do not.
Variable Scope Link to heading
The previous code exhibits a bug in that fps is defined as a local variable meaning it is visible only within the scope of _ready(). But fps needs to be visible to both _ready() and _process(). We must therefore define fps as an instance variable, placing fps in the class scope and visible to all methods of the class. We create an instance variable by moving fps: to the top level.
var fps: Label # Crete a variable of type Label

func _ready():
    fps = Label.new() # Create a new Label object
	  self.call_deferred("add_child", fps) # Explicitly add the label to the scene

func _process(_delta: float):
    fps.set_text(str(Engine.get_frames_per_second())) # Set fps.text to the current fps
instance and local variables differ to static variables in that the value of a static variable is shared across all instances of a class, whereas instance and local variables are specific to an instance.
Static, Instance, and Virtual Methods Link to heading
GDScript only supports the creation of static and virtual methods. Methods not identified as static using the static keyword are virtual and can be overridden (GDScript has no virtual keyword).
A static method can be invoked even if no instances of the class exist yet. A virtual method can only be invoked on an instance of the class.
A developer cannot create non-virtual methods in GDScript. Internal methods exported by the Godot engine through GDScript however can be static, virtual (overridable) and non-virtual (non-overridable).
Conditionals Link to heading
We don’t need to update the frame rate on each frame (e.g. 60 times a second), so we make use of an if conditional to update the frame rate every tenth frame.
func _process(_delta: float) -> void:
	if Engine.get_process_frames() % 10 == 0:
		fps.set_text(FPS_TEXT + str (Engine.get_frames_per_second()))
The % is the modulo or remainder operator. It returns the remainder when dividing the number of frames since game start (Engine.get_process_frames()) by 10. If the remainder is 0 then the conditional is said to evaluate to true and we update the frame rate.
Constants Link to heading
We define several constants with values for maximum frame rate, fps update interval, and the FPS text. Constants are used instead of variables when we don’t want the value assigned to a variable to change during program execution. Some other advantages of constants include improving code readability, and changing the value of a constant will be reflected everywhere that constant is used.
class_name Pong extends Node2D

const MAX_FPS = 0 # Zero means use the maximum frame rate
const UPDATE_INTERVAL = 10 # Update the frames per second every ten frames.
const FPS_TEXT = "FPS: " # Constant prefix displayed with the current fps, e.g. "FPS: 60"
const ACTION_UI_CANCEL = "ui_cancel"

var fps: Label # Crete a variable of type Label

func _ready():
	Engine.set_max_fps(MAX_FPS) # Set the "do not exceed" frame rate.
  fps = Label.new() # Create a new Label object
	fps.set_position(Vector2(0,0)) # Set position
	self.call_deferred("add_child", fps) # Add the label to the scene

func _process(_delta: float) -> void:
	if Engine.get_process_frames() % UPDATE_INTERVAL == 0:
		fps.set_text(FPS_TEXT + str(Engine.get_frames_per_second()))
Handling Player Input Link to heading
We can exit the game by closing the Godot window. But as the plan is to use the keyboard to control the paddles, we may as well start now and explore how to handle keyboard input and exit the game when the Esc key is depressed.
The methods to retrieve player input are provided by the Input Singleton. We use the is_action_pressed() method and filter events to the "ui_cancel" signal which is by default mapped to the Esc key.
See Handling Input for the implementation.
Handling Input Link to heading
Checking if the player depressed the Esc key is straightforward. Input.is_Action_Pressed("ui_cancel") returns true when an event action is received that is mapped to the Esc key.
func _process(_delta: float) -> void:
	if Input.is_action_pressed(ACTION_UI_CANCEL): exitGame()
	if Engine.get_process_frames() % UPDATE_INTERVAL == 0:
		fps.set_text(FPS_TEXT + str (Engine.get_frames_per_second()))

func exitGame() -> void:
	self.get_tree().root.propagate_notification(NOTIFICATION_WM_CLOSE_REQUEST)
	self.get_tree().quit()
We define a method exitGame() to send the “window close” request to the DisplayServer (attached to the root node) and tell the SceneTree to exit.
Game Exit Link to heading
We need to cleanup any resources we allocate (Label) as Godot only supports limited garbage collection.
See Object Constructors and Destructors, Finalizers for the implementation.
Object Constructors and Destructors, Finalizers Link to heading
The virtual methods _init(), _ready(), and _finalize() can be overridden to manage the object life cycle.
_init()is a constructor. This method is called when an object is instantiated in, for example, a call tonew()._init()is called before_ready()._ready()is called after the object is added to the SceneTree and is ready to be used. This means that_ready()is only called on objects added to the SceneTree.finalize()is a destructor, called when the object is deleted following, for example, a call tocall_deferred("free").
Godot supports limited garbage collection, for example resources explicitly allocated (e.g. using new()) must be explicitly deleted using free(). Not doing so will result in memory leaks.
The code shows this; we explicitly instantiated Label using new() requiring that we explicitly delete Label by calling fps.call_deferred("free") (call_deferred()) when we are done with it. We do this in the _finalize() method of our Pong class.
func _finalize() -> void:
	fps.call_deferred("free") # Because we added the label, we also need to delete it
The Pong Node was added to the SceneTree in section Create the Pong Project, so the creation and deletion of the Pong instance is managed by the SceneTree.
Information Hiding and Encapsulation Link to heading
The Pong class can be simplified using information hiding, by encapsulating the frame rate logic into its own FrameRate class in a new res://src/FrameRate.gd file.
### In res://src/FrameRate.gd
class_name FrameRate

var label: Label: # Set and get the Label
	get: return label
	set(value): label = value

var interval: int: # Update the fps at interval
	set(value): interval = int(value)

func _init(pos: Vector2, i: int):
	label = Label.new()
    label.position = pos
    internal = i

func update(frames: float) -> void:
	if int(ceil(frames)) % interval == 0:
		label.text = "FPS: " + str(frames)

func Node() -> Node: return label
- We implement getters and setters for
labelandintervalas an example of how GDScript allows hiding variables from direct access by external methods. Getters and Setters are useful when additional logic must execute each time a variable is accessed. Here for example, we convert a value to an integer before assigning tointerval. GDScript does not support public or private methods so getters/setters are as close as we can get. - The
_init()function accepts aVectorcontaining the position and an update interval as aninteger. The ability to change the_init()constructor in this manner is called_constructor overloading. Note that GDScript only allows a single_init()function in a class. - The function
ceil(frames)inupdate()rounds up a fractional frame rate to the nearest integer, e.g.33.2becomes34. - We define a method
node()as the interface for retrieving theLabelNddeassociated with theFrameRateobject. IfFrameRatehad instead extendedLabel, thennode()would return theFrameRateobject itself, see Composition vs Inheritance.
Now Pong is refactored to remove the frame rate logic;
### In res://src/Pong.gd
func _ready() -> void:
	Engine.set_max_fps(MAX_FPS)
	fps = FrameRate.New(Vector2(0,0), UPDATE_INTERVAL)
	addChild(fps.Node()) # Add the fps.label as a child Node to Pong

func _process(_delta: float) -> void:
	if Input.is_action_pressed(ACTION_UI_CANCEL): exitGame()
	fps.update(Engine.get_frames_per_second())

func addChild(n: Node) -> void:
	self.call_deferred("add_child", n)
Pong is responsible for adding the FrameRate object to the SceneTree. via addChild().
Duck Typing, Polymorphism, Function Overloading and Function Overriding Link to heading
GDScript is (GdScript supports “Duck) Typed”, meaning that it is not required to specify an argument type in the method parameter list. For example if we don’t specify the type of the parameter accepted by FrameRate.update(frame) then any type may be passed;
func update(frames) -> void:
	if int(ceil(frames)) % interval == 0:
		label.text = "FPS: " + str(frames)
But update will fail at runtime if it receives a parameter not of type int or float.
Duck Typing is a form of polymorphism – a single function that is able to accept different types for the same parameter.
GDScript does not support function overloading (except for _init()) – different functions with the same function name but different parameters, so methods may not share the same method name in a class.
GDScript does support Function overriding – a function in a derived class providing an implemention already provided by a function in superclass. We see this with the virtual methods _init() and _process().
Alternative Implementation Link to heading
The FrameRate object is able to add itself to the SceneTree by passing the Pong node in the FrameRate constructor init(self, Vector2(0,0), UPDATE_INTERVAL). See the example below.
### In res://src/Pong.gd
func _ready() -> void:
	Engine.set_max_fps(MAX_FPS)
	fps = FrameRate.new(self, Vector2(0,0), UPDATE_INTERVAL)

### In res://src/FrameRate.gd
func _init(parent: Node, pos: Vector2, i: int) -> FrameRate:
	label = Label.new()
	label.position = pos
	interval = i
	parent.call_deferred("add_child", label)
Having FrameRate add itself to the SceneTree introduces the SceneTree as a dependency in FrameRate, complicating unit tests. We would need to pass a SceneTree just to test FrameRate. Having Pong add FrameRate to the SceneTree removes this dependency.
FrameRate.update() can retrieve the frame rate directly instead of receiving the frame rate from Pong._process(). See the example below;
### In res://src/Pong.gd
func _process(_delta: float) -> void:
	if Input.is_action_pressed(ACTION_UI_CANCEL): exitGame()
	fps.update()

### In res://src/FrameRate.gd
func update() -> void:
    var frames: float = Engine.get_frames_per_second()
	if int(ceil(frames)) % interval == 0:
		label.text = "FPS: " + str(frames)
But this introduces the Godot engine as a dependency when testing FrameRate.update(). Always try to minimize dependencies and side-effects when writing software.
Composition vs Inheritance Link to heading
… classes should favor polymorphic behavior and code reuse by their composition (by containing instances of other classes that implement the desired functionality) over inheritance from a base or parent class – https://en.wikipedia.org/wiki/Composition_over_inheritance
Composition over Inheritance Explained by Games – YouTube – https://www.youtube.com/watch?v=HNzP1aLAffM
HN: Game developers: don’t use inheritance for your game objects – https://news.ycombinator.com/item?id=3560408
Inheritance vs composition is a design choice. GoDot definitely favors inheritance, however composition is preferable in many scenarios.
Our implementation uses composition where FrameRate contains a Label (“has-a”). But FrameRate can inherit from and extend Label (“is-a”), see the example below.
### In res://src/Pong.gd
func _process(_delta: float) -> void:
	if Input.is_action_pressed(ACTION_UI_CANCEL): exitGame()

### In res://src/FrameRate.gd
class_name FrameRate extends Label

var interval: int: # Update the fps at interval
	set(value): interval = value

func _init(pos: Vector2, i: int):
	position = pos
	interval = i

func _process(_delta: float) -> void:
    var frames: float = Engine.get_frames_per_second()
	if int(ceil(frames)) % interval == 0:
		text = "FPS: " + str(frames)

func node() -> Node: return self
Inheritance generally has the advantage of less code and this holds true here;
- The logic from
FrameRate.update()moves into the inherited virtual methodFrameRate_process(), Pong._process()no longer needs to callFrameRate._process()as the SceneTree callsFrameRate_process()on each frame.
A disadvantage of inheritance is that rendering the frame rate in a 3D scene requires that FrameRate inherit from Label3D which means defining a new class FrameRate3D. This new class contains much the same logic as Label resulting in double the code. Inheritance generally leads to the proliferation of small classes.
Using composition, we can modify FrateRate to support both Label and Label3D as follows;
### In res://src/Pong.gd
### Specifying a 2D label, passing this object into FrameRate
func _ready() -> void:
	Engine.set_max_fps(MAX_FPS)
	fps = FrameRate.new(Label.new(), Vector2(0,0), UPDATE_INTERVAL)
	addChild(fps.node())

### In res://src/Pong.gd
### Specifying a 3D label, passing this object into FrameRate
func _ready() -> void:
	Engine.set_max_fps(MAX_FPS)
	fps = FrameRate.new(Label3D.new(), Vector2(0,0), UPDATE_INTERVAL)
	addChild(fps.node())

### In res://src/FrameRate.gd
var label: Node:
	get: return label
	set(value): label = value

func _init(n: Node, pos: Vector2, i: int):
	label = n
	label.position = pos
	interval = i

func node() -> Node: return label
Pong creates either a Label or Label3D and passes this object to the FrameRate.New() constructor. Using composition actually results in less code and one less class.
GDScript supports composition but unfortunately does not support “Embedding”, where the methods of the “contained” object are promoted to the same level as the methods of the container. If GDScript supported embedding then instead of label.position = pos, we could write position = pos.
Conclusion Link to heading
All that to display the current frame rate. If we had jumped right into the implementation we would also have had to consider loading assets, collision detection, implementing physics for ball strikes and bounces, sound effects, and player point scores for game start and game over. Never mind some rudimentary AI if we want to support single player mode against a computer opponent.
We will need to do all this anyway, but trying to implement all of that, while learning GDScript, while learning how the Godot engine works is a lot to bite off.
See The Final Code for the implementation.
The Final Code Link to heading
res://src/Pong.gd
class_name Pong extends Node

const MAX_FPS = 30 # Zero means use the maximum frame rate
const UPDATE_INTERVAL = 10 # Update the frames per second every ten frames.
const FPS_TEXT = "FPS: " # Constant prefix displayed with the current fps, e.g. "FPS: 60"
const ACTION_UI_CANCEL = "ui_cancel"

var fps: FrameRate

func _ready() -> void:
	Engine.set_max_fps(MAX_FPS)
	fps = FrameRate.new(Label.new(), Vector2(0,0), UPDATE_INTERVAL)
	addChild(fps.node())

func _process(_delta: float) -> void:
	if Input.is_action_pressed(ACTION_UI_CANCEL): exitGame()
	fps.update(Engine.get_frames_per_second())

func exitGame() -> void:
	self.get_tree().root.propagate_notification(NOTIFICATION_WM_CLOSE_REQUEST)
	self.get_tree().quit()

func _finalize() -> void:
	fps.call_deferred("free") # Because we added the label, we also need to delete it

func addChild(n: Node) -> void:
	self.call_deferred("add_child", n)
res://src/FrameRate.gd
class_name FrameRate

var label: Label:
	get: return label
	set(value): label = value

var interval: int: # Update the fps at interval
	set(value): interval = value

func _init(l: Node, pos: Vector2, i: int):
	# Create the label in _init() as FrameRate is not added to
	# the SceneTree hence _ready() is not called.
	label = l
	label.position = pos
	interval = i

func update(frames: float) -> void:
	if int(ceil(frames)) % interval == 0:
		label.text = "FPS: " + str(frames)

func node() -> Node: return label
Advanced Concepts Link to heading
It is possible to define your own lightweight Nodes. We mention this but an example is too advanced for this tutorial.
Versions Link to heading
- 0.1 – Initial.
